Main Character
In MANU, Main Character is one of the default units of every scene. It is represented by a humanoid avatar commonly used in most side-scroller platformer games. This article introduces an overview of the character settings that you can tune to meet your game design goals. You may change the default mechanic settings of the character and also import your own character model. The details for performing these actions are below.

By default, the Main Character is a group of objects displayed in the Scene tree that includes subgroups of Model and Animations assets within the MainCharacter Body group.The MainCharacter Body includes a component that consists of a character and a capsule with state machine.
The "Model" subgroup contains 3D models of the main character, including its mesh, rigs, bones and related animations. "The Animation for states" subgroup includes a list of state machine animations that are triggered by a certain state of the main character.

Properties
If the MainCharacter is selected in the Scene panel in Edit Mode, the following settings become available in the Inspector: walk, jump, wall, crouch, and slide. One of the powerful features of MANU is that you can tune Main Character settings right in the Game Mode, these changes will be applied immediately.

Walk
Walking mechanic is controlled by right and left arrow keys in the Game Mode. The speed for walking can vary from 0 to 100 m/s. Acceleration Time defines the rate of change of the main character’s velocity with time and is displayed as a coefficient number that ranges from 0 to 1. If you want your game character to walk faster, the value for acceleration time needs to be close to “0”.

The Step Height Limit allows you to set up the limit for walking up the stairs or other objects, such as a pile of stones, depending on how tall they appear in the scene. It ranges from 0 to 9999 meters.
Jump
Jumping mechanic is controlled by a key. To Double Jump, hit twice. To control the direction for jumping, use +Left arrow key or +Right arrow key. The value for Jump Height equals to meters in the game world. The default value for Double Jump Height is the same and can range from 0 to 9999.

Hor. Move Speed stands for Horizontal Move Speed that defines the speed value for the main character’s movement forward and backward. The value can be set within the range from 0 to 9999.
The Hor. Move Inertia setting stands for Horizontal Move Inertia that determines the tendency of the main character to keep moving forward in a straight line at a constant speed, when no forces act upon it. This setting is represented by a coefficient value that varies from 0 to 1.
Wall
Wall mechanics includes settings for Climb Speed and Jump Height. Essentially, Climb Speed stands for the ability of the main character to get a hold of the wall or other static objects in the scene and temporarily “stick” to it. The lower the Climb Speed, the faster the character will fall down from the wall. The higher the Climb Speed value, the faster it can climb up if holding the right or left arrow keys, depending on the direction the character is facing. If the Climb Speed is a negative number, then the Main Character is being dragged down.

Jump Height determines how high the main character can jump off from the wall after hanging on it. To complete the Wall Jump, hold the left or right arrow key and hit SPACE.
Crouch
To use the Crouch mechanic, hit <C+Left/Right Arrow> keys. This will trigger an animation, where the main character moves forward in a position where its knees are bent and the upper body is down lower to the ground. If you want to change the height of the physics collider of the main character, use the Height settings to decrease it. The height value is in meters and is set for the entire capsule, it cannot be less than the capsule’s diameter.

To view the changes of the сrouch Height, go to the Game mode, click on the Main Menu > View > Physics Colliders. Then, to view the Inspector panel, click on the Main Menu again > select View > Hide Right Panel. Please note that the changes made in the Inspector panel in the Game Mode will be saved when you switch back to the Edit Mode. Be sure to save the project before closing MANU, otherwise you may lose the settings you made in the Game mode.

When crouching, the main character would normally move slower as it’s default walk speed. Crouching and walking are independent mechanics, so if you change the default settings for crouching, the settings for walking will remain the same. You can adjust the crouch speed by changing its value using the Speed setting. If there is a physical obstacle above the character, it will remain in the crouching state even if no key is pressed. When the obstacle disappears, the character will stand up.
Slide
If a main character reaches a surface rotated to a certain degree (slope limit), such as a downhill, it would trigger a Sliding mechanic.

By default, the Speed of the sliding mechanic is generally twice as fast as the walking speed. You can adjust this setting by setting a custom value within 0 to 9999.
Lastly, you can disable the jumping mechanic as the main character slides by using YES/NO toggle for Allow Jump.
The Slope Limit sets the boundaries (in degrees) for the main character to slope. The surfaces in the scene that are rotated to a degree that exceeds that limit will trigger the slope movement. All surfaces that are below this limit will have the main character to stand and walk on it.
Physics
This section describes some of the default physics settings pertaining to the main character in MANU. They are available in the Physics tab of the Inspector panel and are represented by rigidbody and collider properties.

Gravity and Mass
The main character has its own Gravity and Mass.

The Mass setting impacts on interactions with dynamic objects in the game, including the dynamic of reaching the main character’s maximum speed when moving in the 3D world. For example, if you want to create a massive-looking effect for a character, you would want to adjust its mass to make it appear heavy and stronger so that it interacts with other dynamic objects accordingly. In other words, it would take longer for a heavy character to accelerate, however, it’s going to apply a stronger force when interacting with dynamic objects along the way.
Main Character has its own Gravity setting to support the creation of an interesting gameplay or game level. It can be used for creating levels where you want your character to appear heavy in the game while the traditional gravity law is applied to other objects in the game, or vice versa.
Collider
The main character’s default type of collider is Capsule. Changing the collider type for the main character is not available, although other collider settings are available for tuning, such as, Radius, Height, and Direction.

Radius value represents a straight line from the centre to the circumference of the main character’s collider that ranges from 0 to 4999.5 units.
The default Height for the collider is set to 2 meters, it equals the sum of cylinder height and 2 *radius. The Direction determines an axis you want the collider Length to be adjusted to. To learn more about the collider settings, please go to Physics.
Importing Custom Character
In MANU, you can import any 3D model to create your custom character. As noted earlier, the default Main Character is represented by a group of objects displayed in the Scene tree. It includes subgroups of Model and Animations assets within the MainCharacter Body group. The Animation subgroup includes a list of state machine animations that are triggered by a certain state of the main character. This includes the following animations: crouchIdle, crouchWalk, fallingIdle, floating, frontFlip, idle, jump, slide, toCrouch, toCrouchForward, toStand, toStandForward, walk, wallHangIdle, and wallJumpUp.

Each of this animation has its own embedded animation, so instead of deleting these default animations, you can simply swap the embedded animations with the custom ones you have on your computer. The example below introduces step-by-step instructions on how to import a new custom character.
To import a new main character to MANU, go to Main Menu > File > Import > Select a folder with new character assets to upload. For this article we use this model.
First let's import new model with animations and rename parent folder to "Patrick". Please see article Import models for more information.
Folder with new character's model should be in MainCharacter > MainCharacter Body > Model

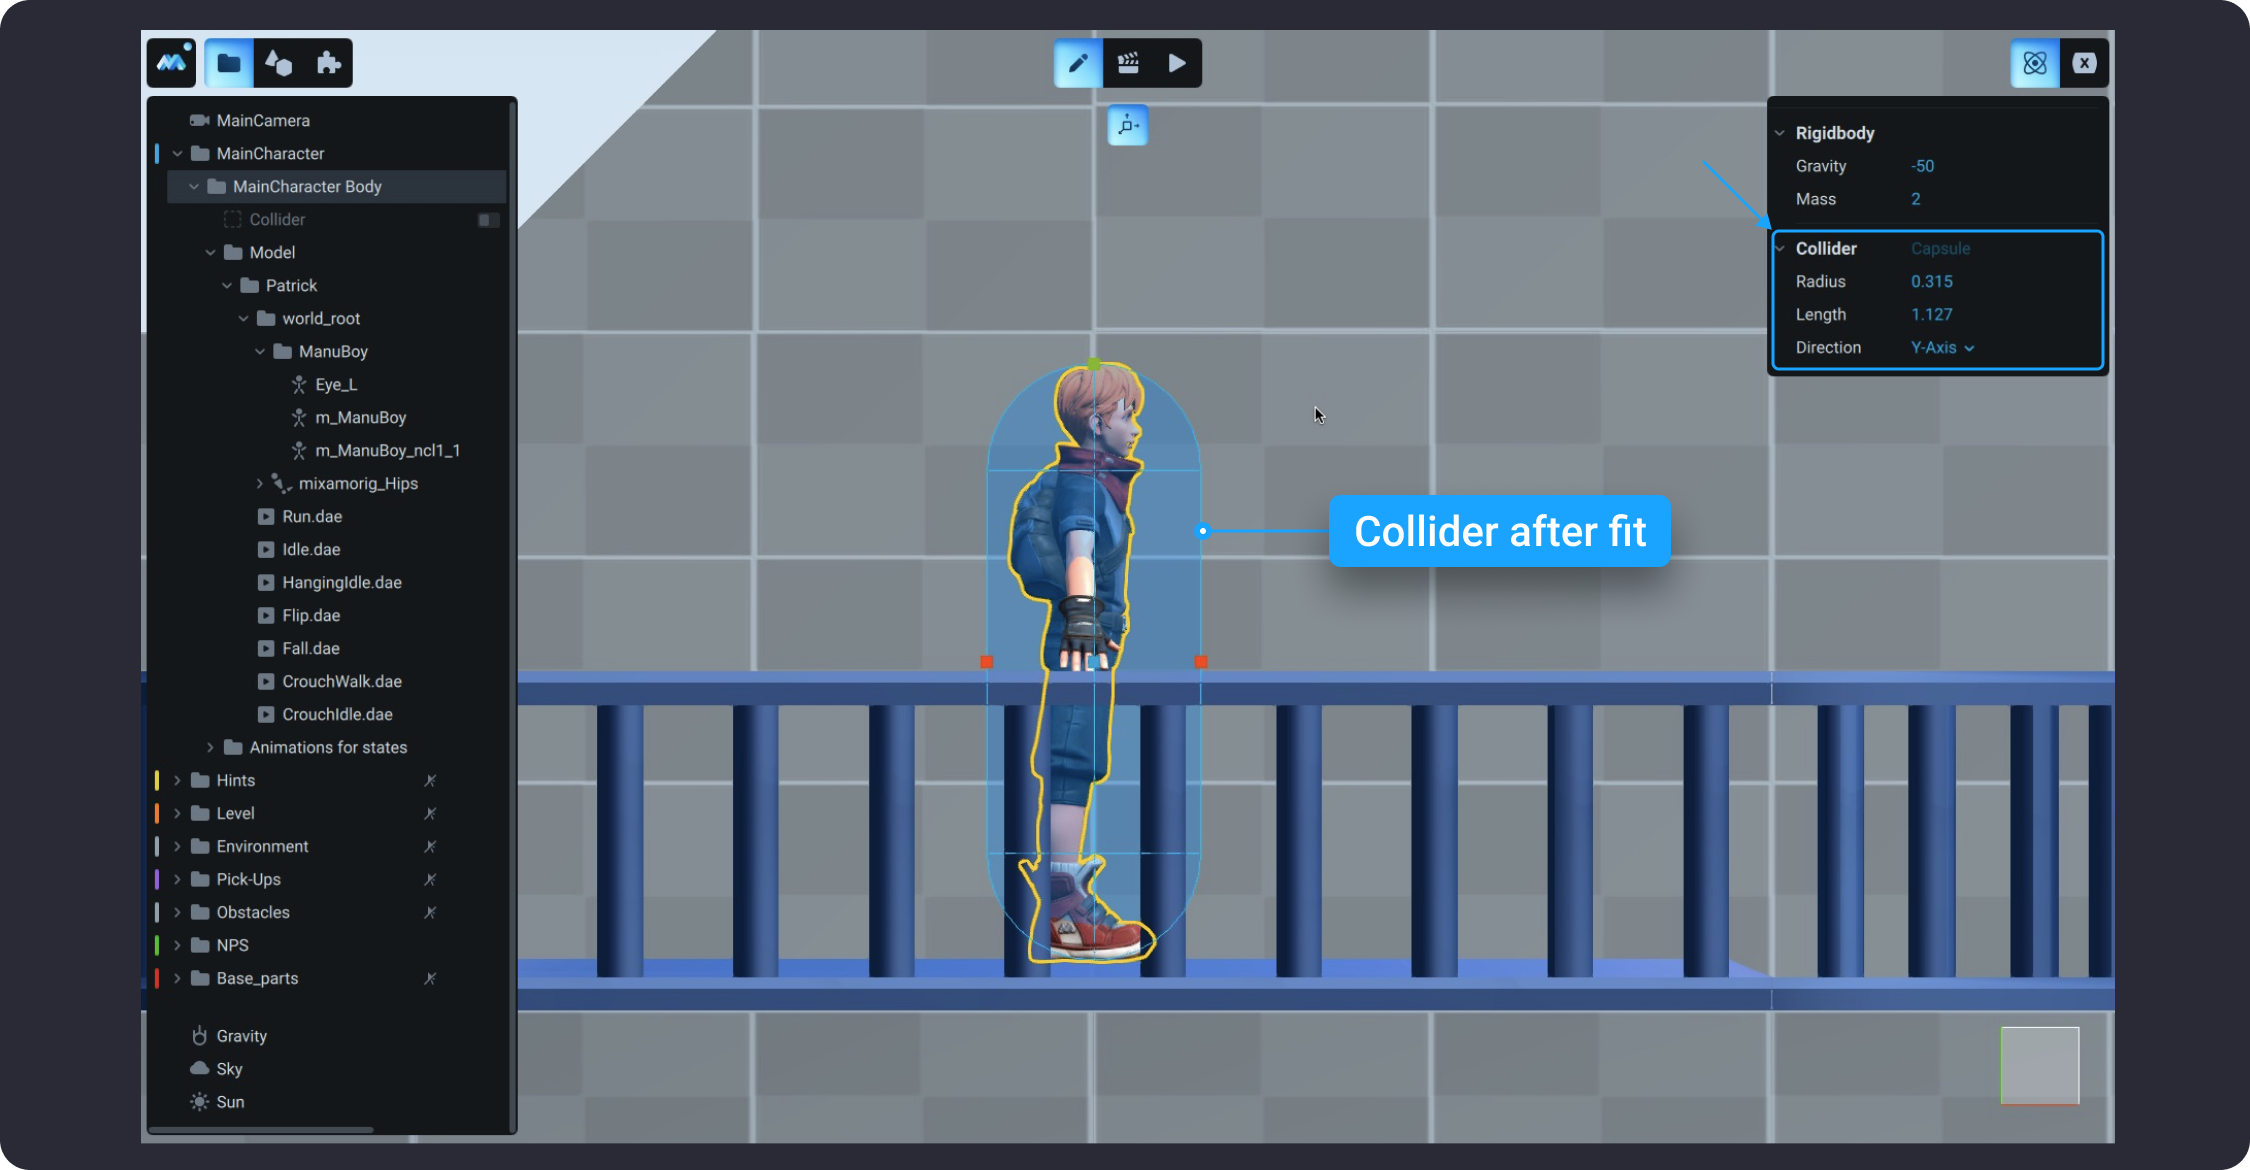
Also we need to check and tune physical collider for new model. Please see article Physics for more information about colliders.

Let's add new animations for main character. For that we need to insert new animations to specific timelines in folder "Animations for states". You can read article about inserted animations here.
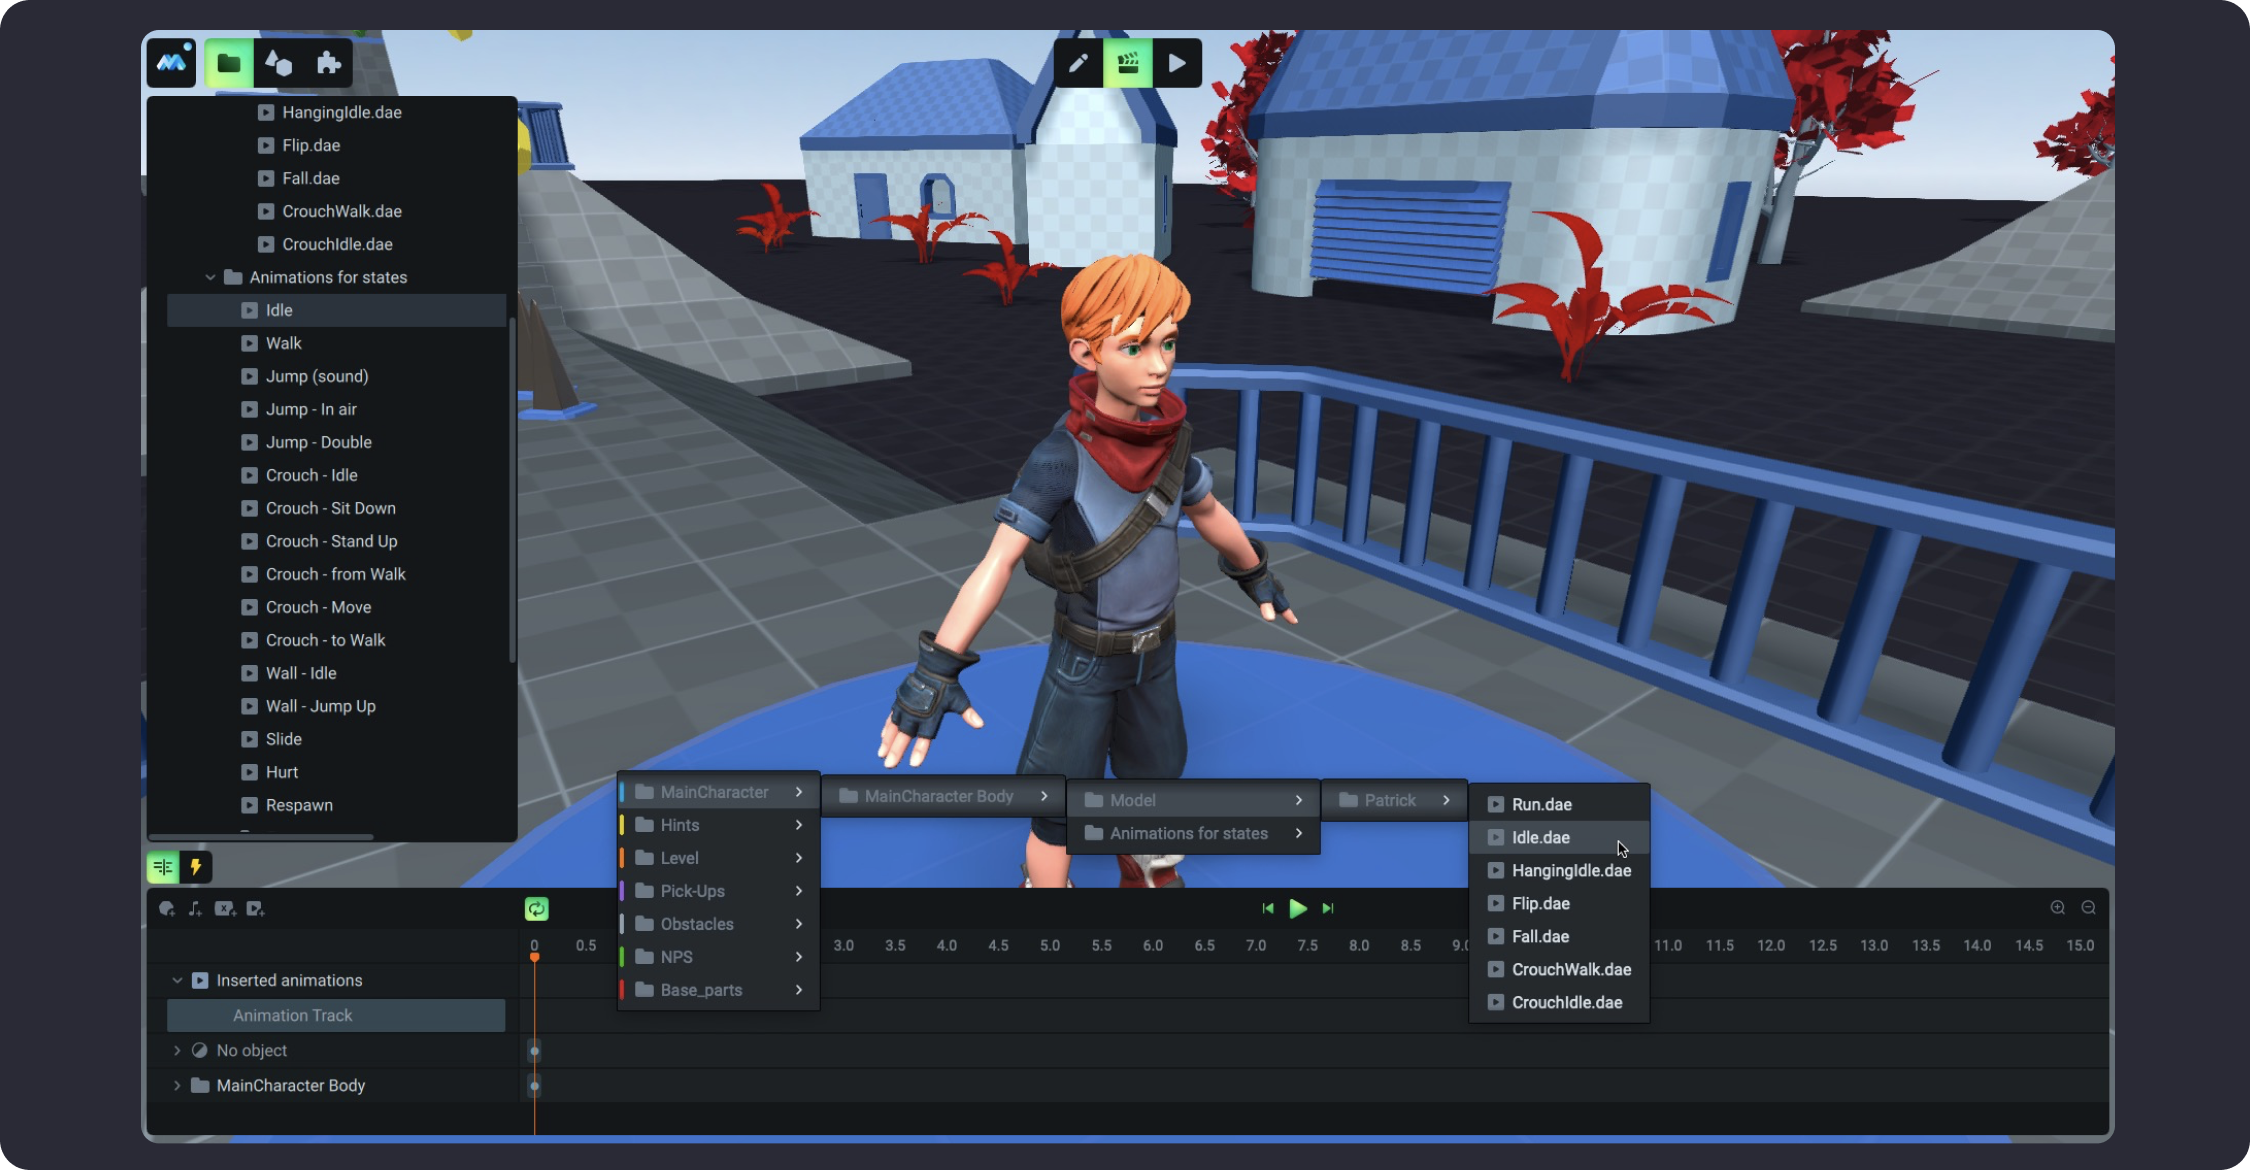
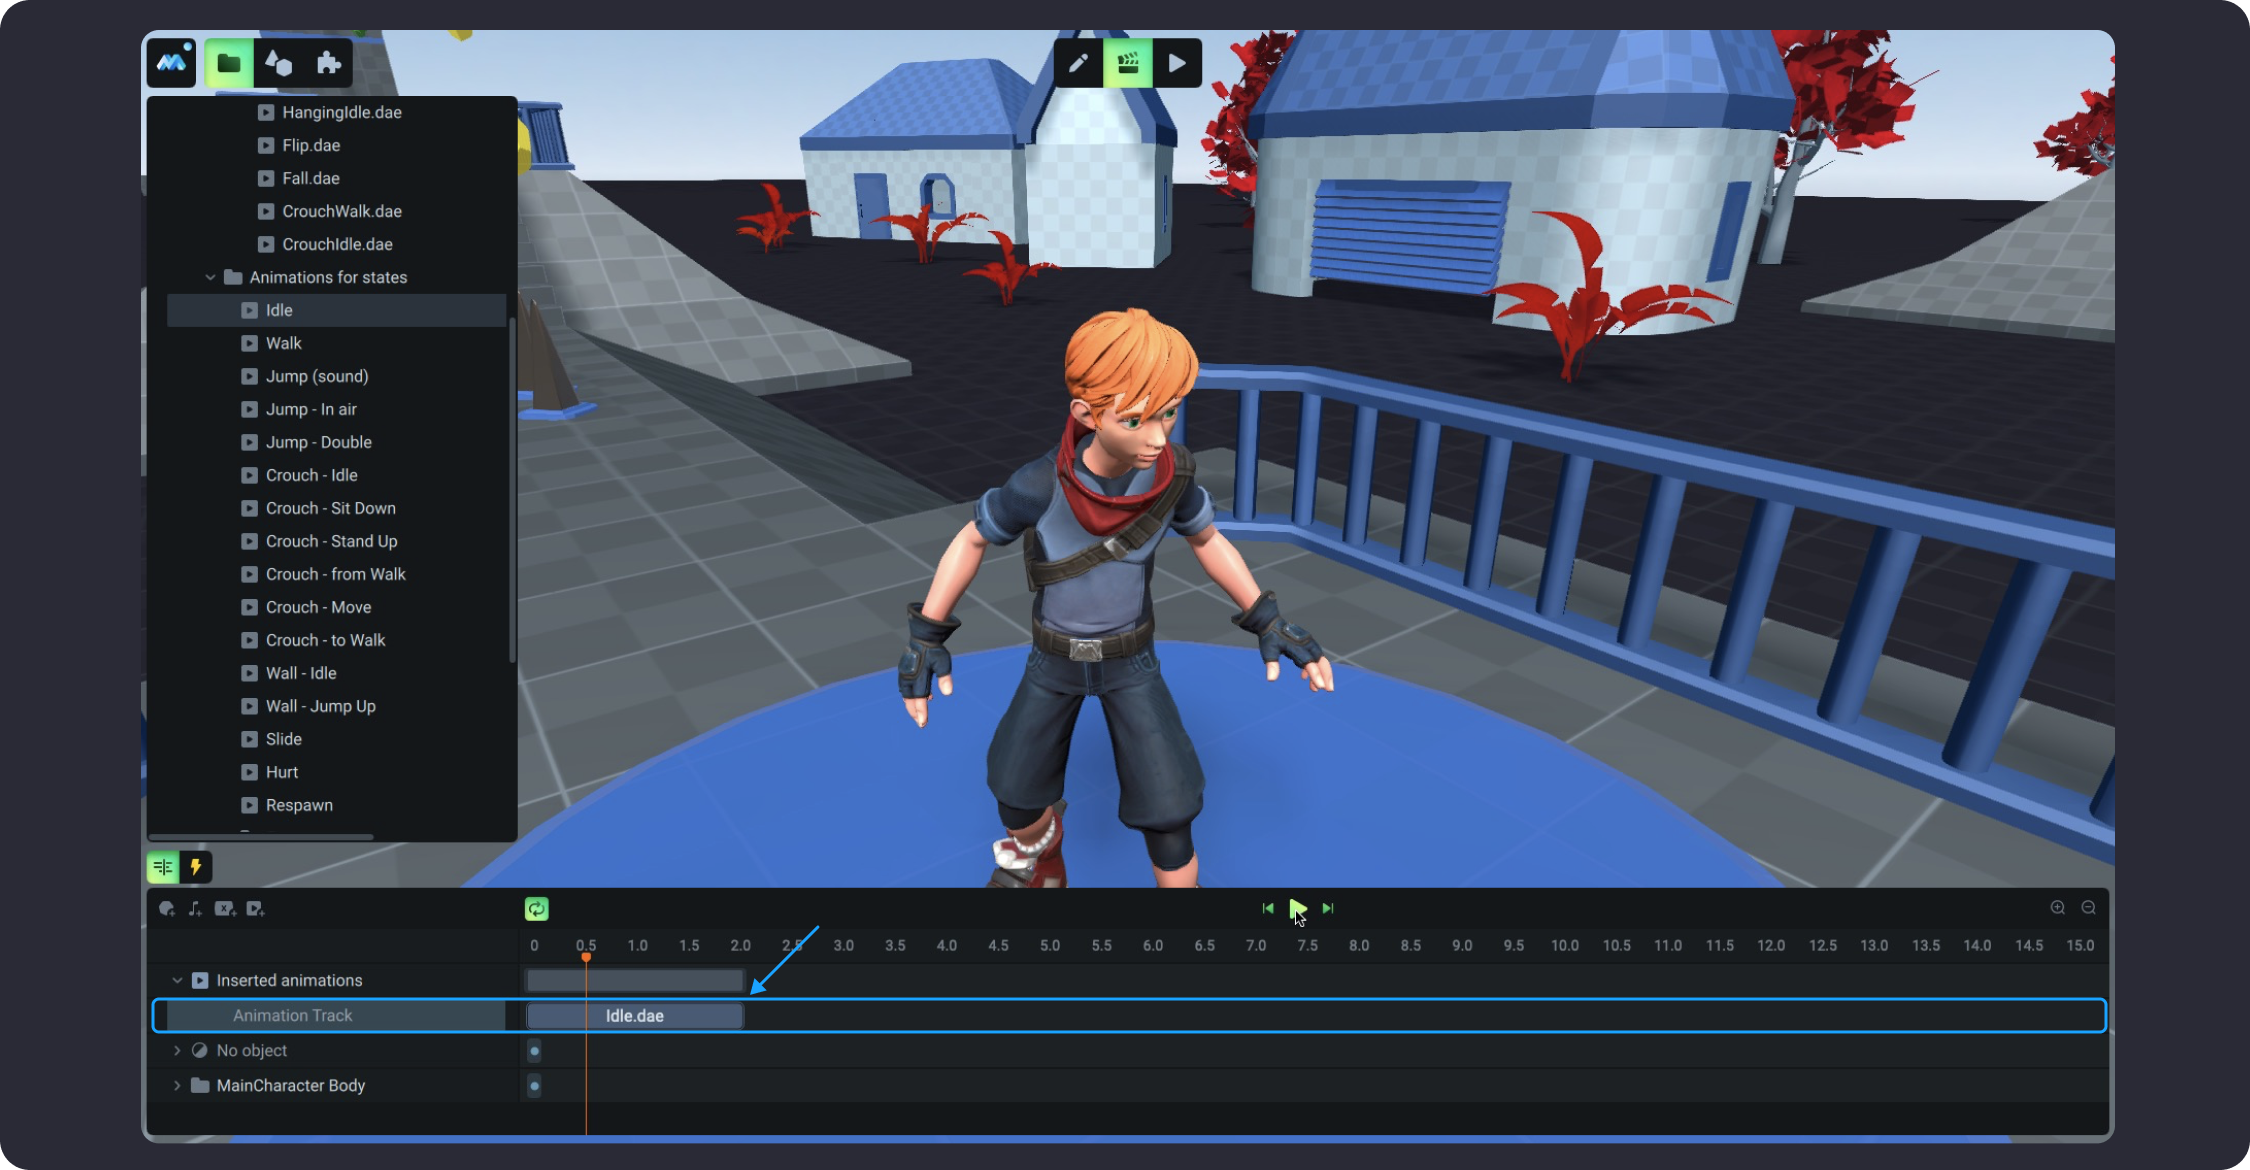
After all animations are inserted correctly your main character must be ready to use in the game. You may now check the work of mechanics in the Game Mode.

Tips for using animations from Mixamo
You can use animations created on the Mixamo website for your model/character. When downloading the animation from the website, do not forget to check the "in place" box if there is one.
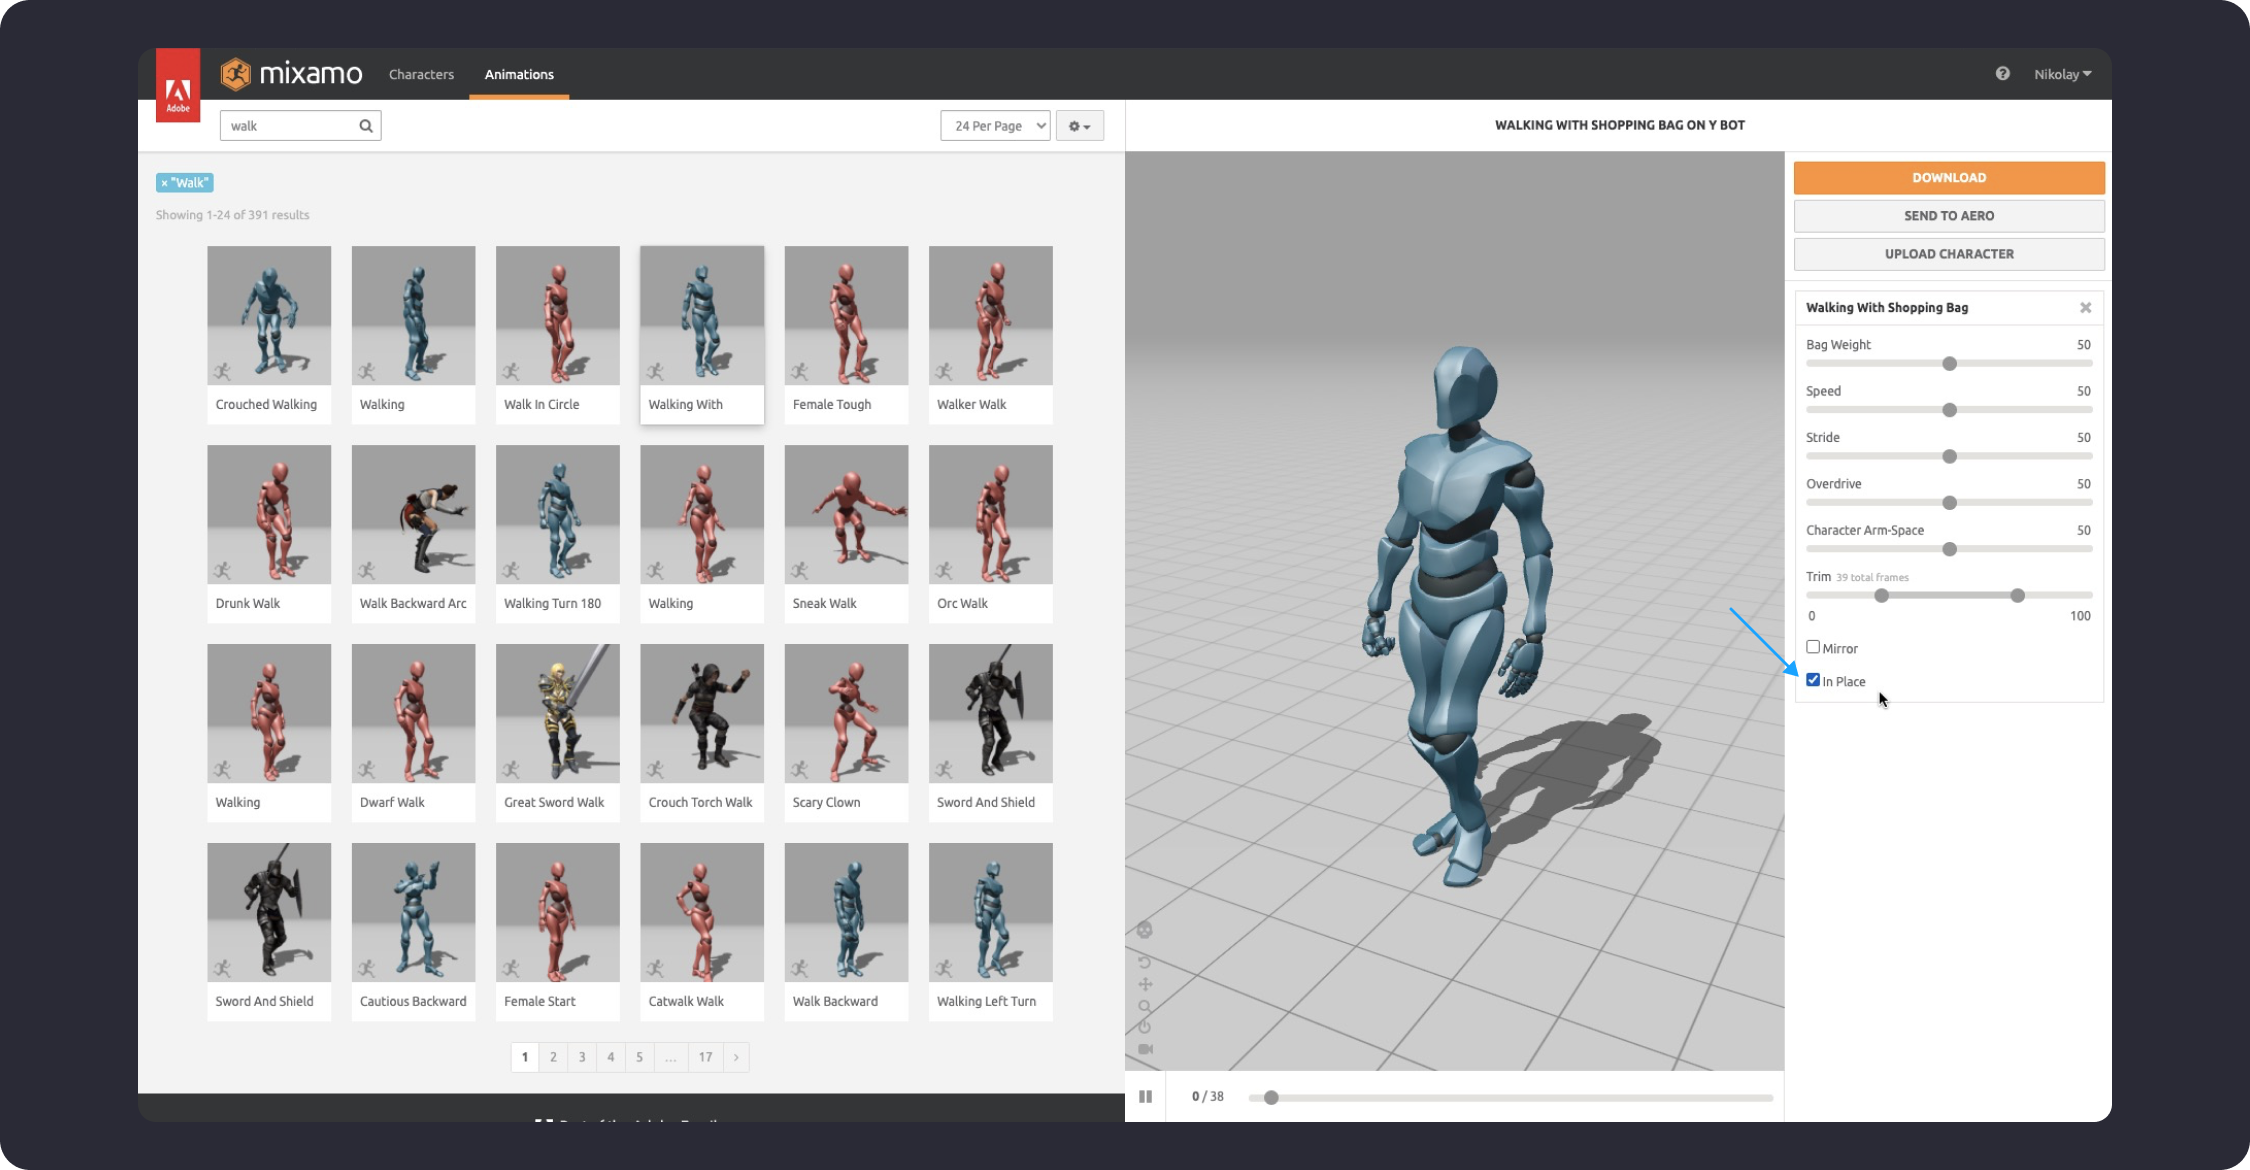
In this case, you will be able to download the animation, which will be played correctly in MANU (the character will not move anywhere and will be in the position you need). However, if Mixamo does not offer you to download the correct animation and there is no "in place" box option to click, you still can download and use this animation. But this animation will move the position of the model (the model will exit the capsule/StateMachine). You can see it in the image below.
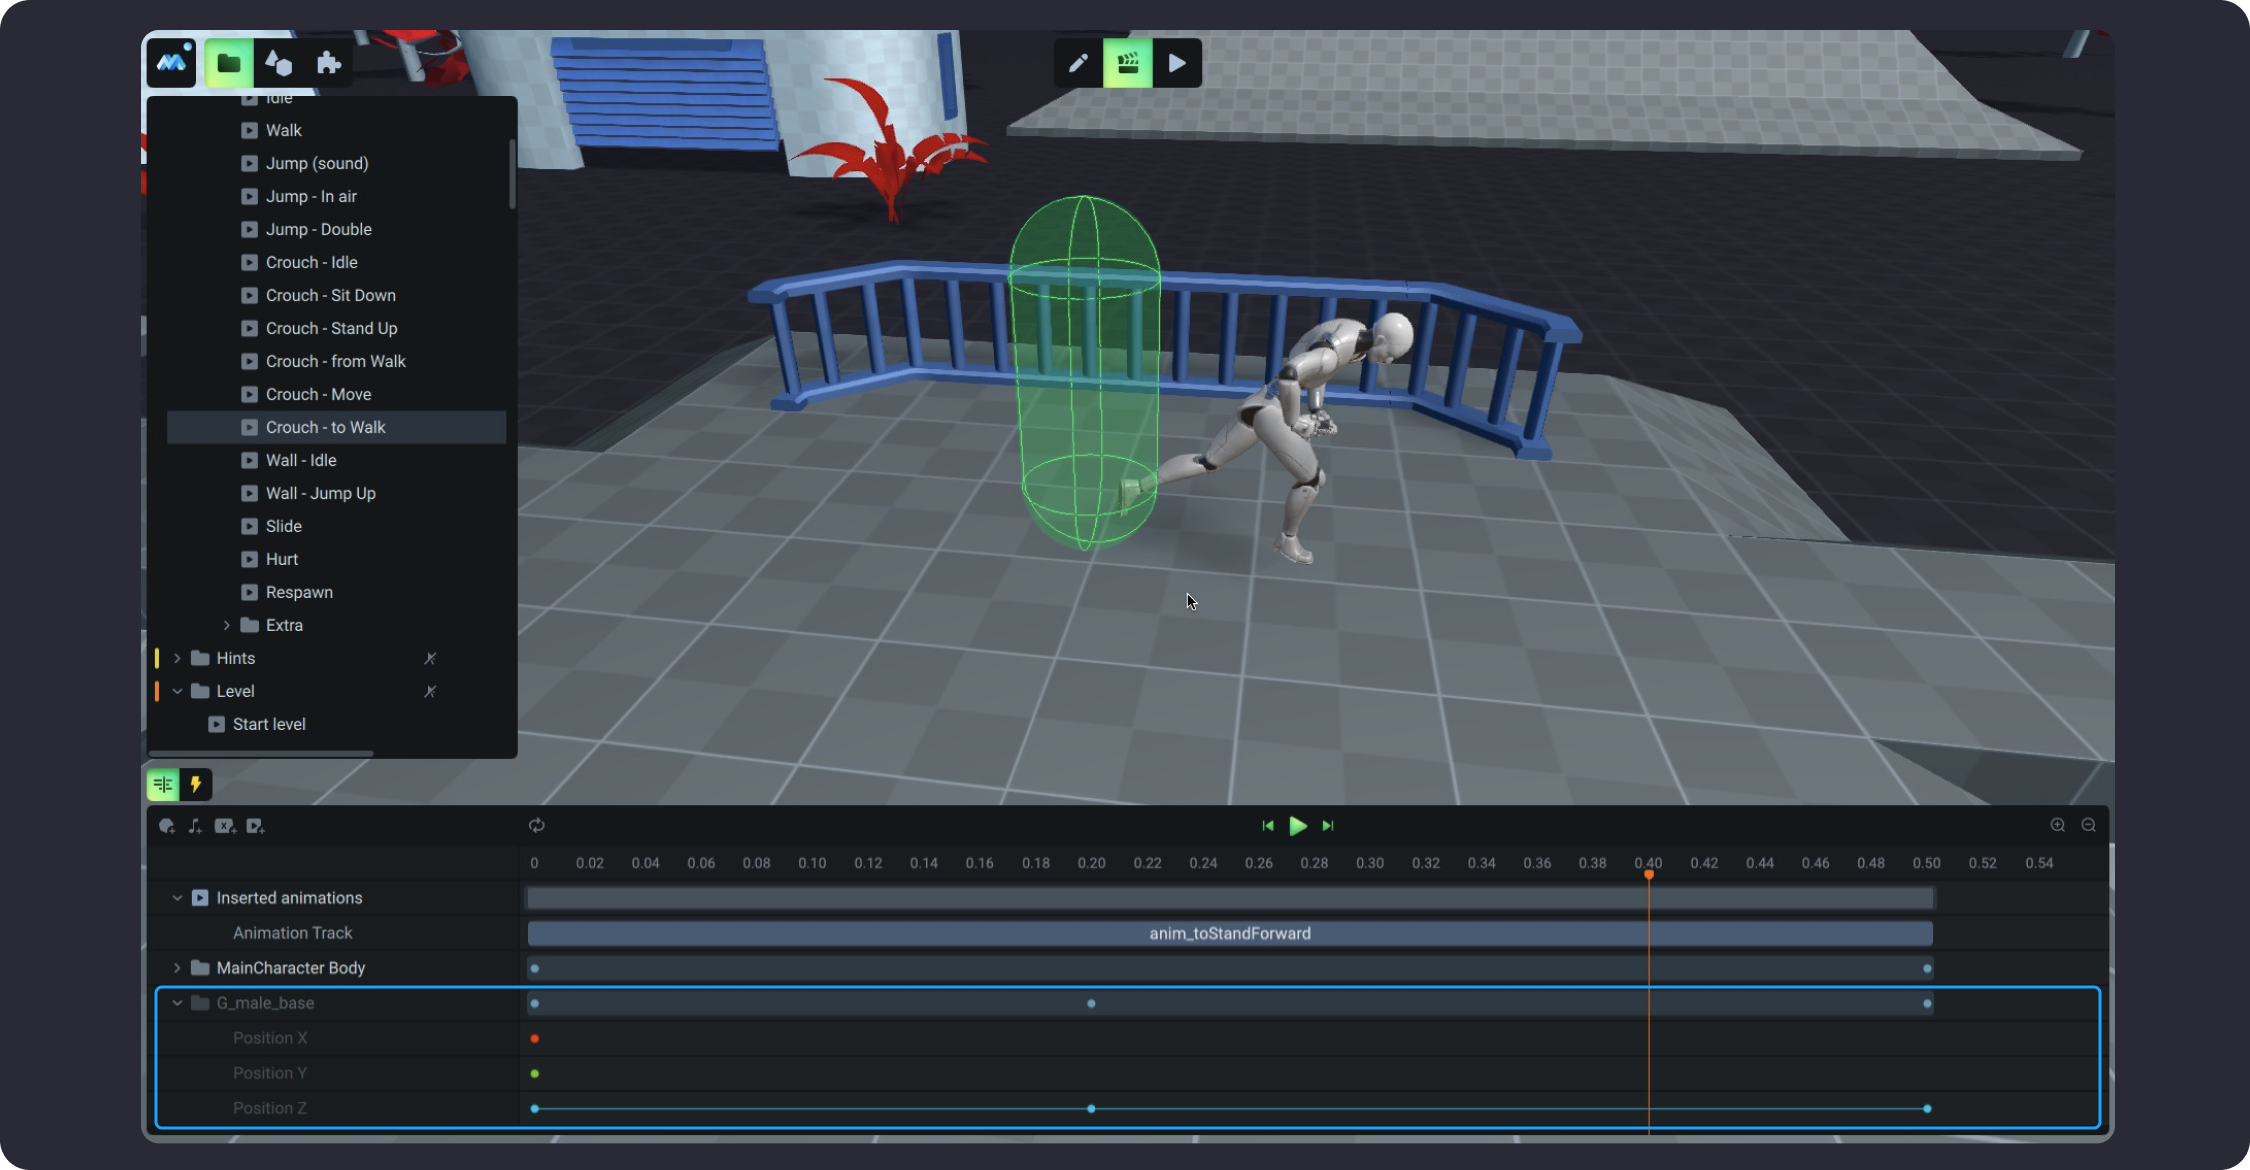
To solve this issue, we recommend that you add an extra track to the Timeline and animate the main folder of the imported character (parent folder). After that, on this track, set the correct values for Positions, so that the model/character does not move in the Scene. See details in the image below.
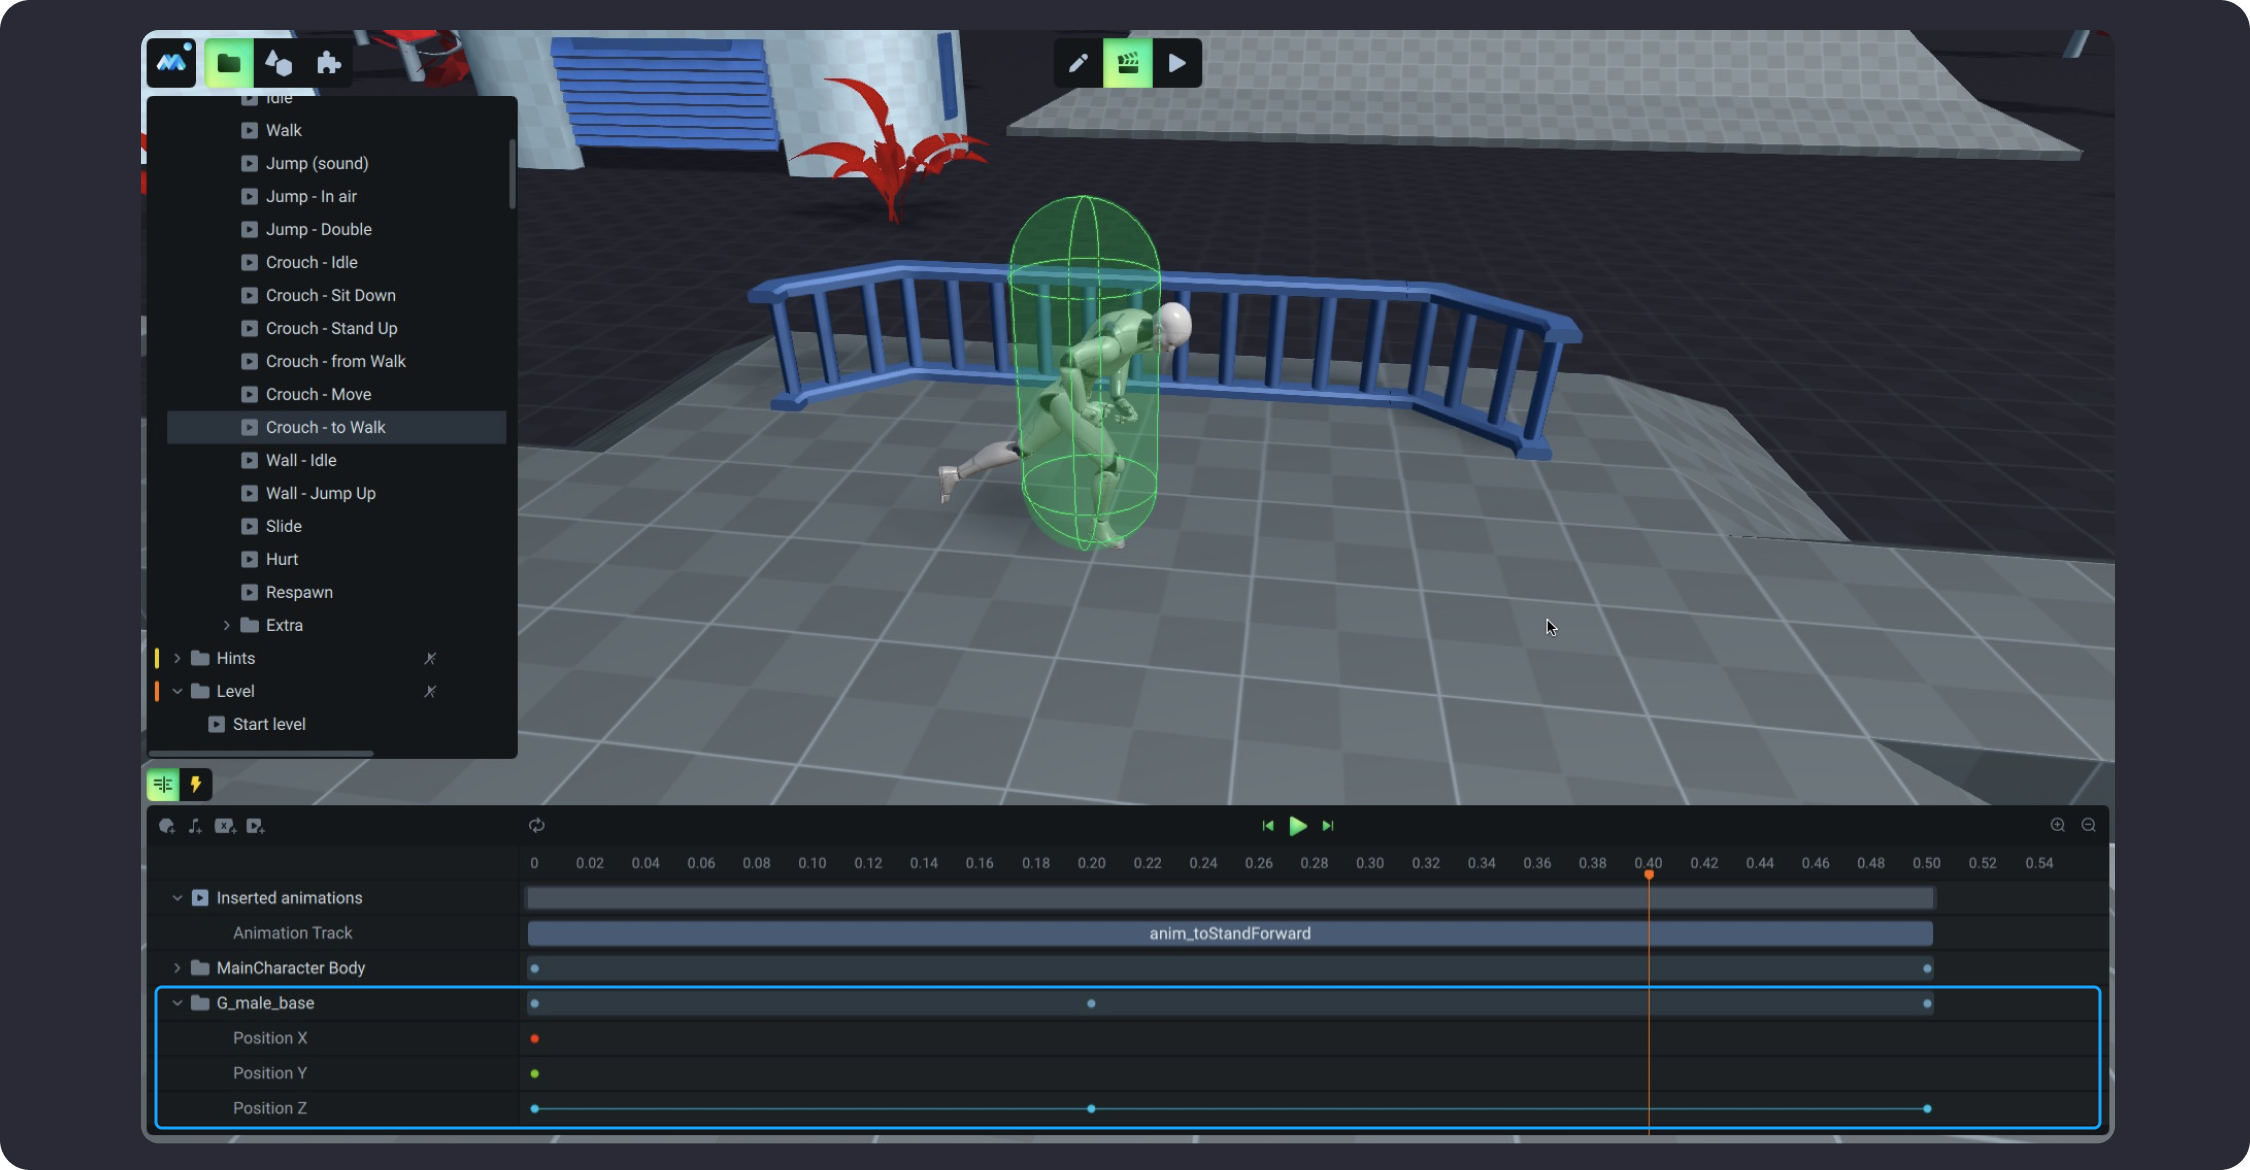
As you can see on the screenshot below, there is a MainCharacterBody folder added to the Timeline. Keep it as it is. Due to the presence of this folder in the Timeline, the character works correctly.
Last updated